Templates (email, task, SMS)
By using templates, you don’t have to write the same Email/SMS message again and again. By inserting variables, you can personalise your messages.
Listing templates
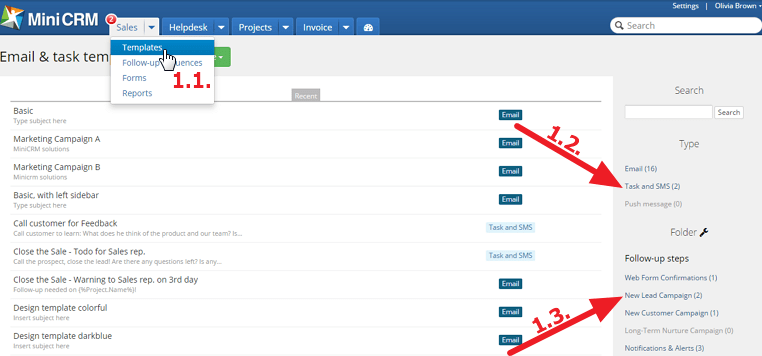
If you select the Templates menu item in a module [1.1.], all templates are listed in descending order of their modification dates.
Filter by types
To filter the templates, click on a type (Email, Task and SMS) [1.2.].
In the brackets you can see the number of templates belonging to a type.
Filter by folders
To filter the templates, click on a folder [1.3.].
In the brackets you can see the number of templates belonging to a folder.
It is possible to create more groups of folders that can be customized as well.
For more information, see: Creating Folders
Creating, copying
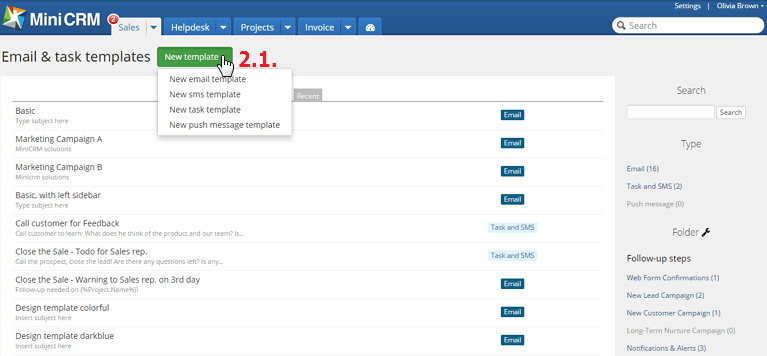
To create a template, click on the [New template] button [2.1.] and select a type.
To modify a template, click on it and make the changes.
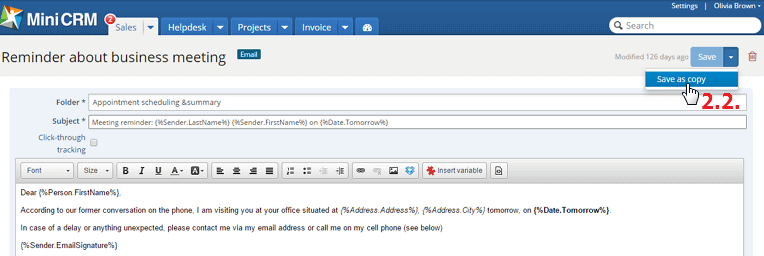
To create a copy, click on the [Save] > [Save as copy] option [2.2.].
It is required to type a name, that is only shown on the list of templates, into the Template name field.
In the Folder field you have to select a folder for the template.
It is required to fill out the Subject field because the client will see it as the subject of the email.
Formatting and variables
By using Design Templates, your messages can fully reflect your corporate identity.
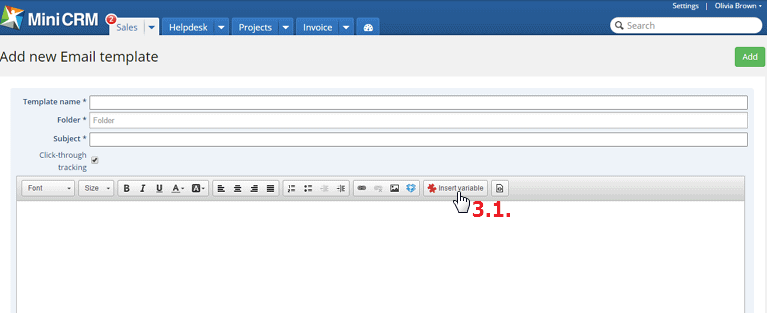
To insert a Variable, click on the [Insert variable] button [3.1.] and select one from the popup window.
Displaying variables
In templates, variables are displayed in the following format: {%variable%}
In sent emails or tasks, they are replaced with the recipients’ data.
Example: If the recipient’s name is William, he will see the Dear William, salutation instead of the Dear {%Person.FirstName%}, variable.
Entering default values
If you insert a variable but the relevant field is empty, nothing will be displayed. For example, if a lead didn’t give their first name when they signed up, the salutation will be the following: Dear ,
To avoid this, type the following: {%Person.FirstName?:”Reader”%}
In that case, the client will see the following in the message: Dear Reader,
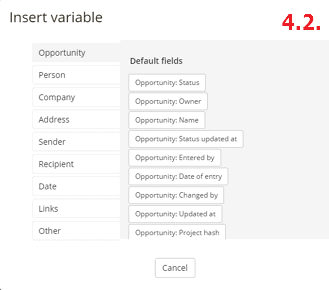
Variable types
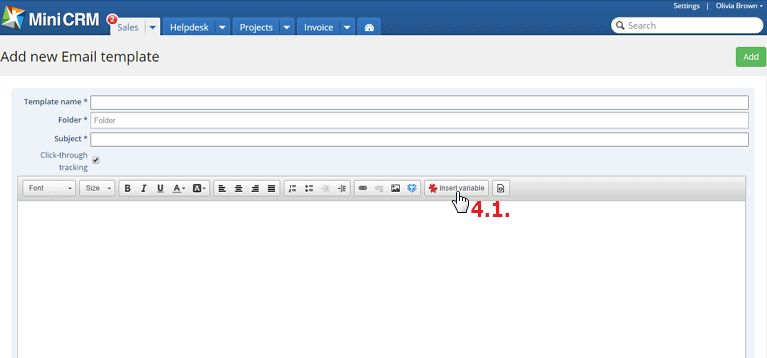
To insert a variable, click on the [Insert variable] button [4.1.] and select one from the popup window [4.2.].
The following variables are available:
- Card and contact fields (Card, person, company, address, sender, and recipient)
- Date
- Links
- Other
Card and contact fields
All field values can be used in variables.
Variables regarding the company/person are inserted according to the recipient. The following cases can occur:
- Company with Contact Person: Variables regarding companies are inserted based on company data, and those regarding persons are inserted based on that person’s data.
- Person belonging to a Company: Variables regarding companies are inserted based on company data, and those regarding persons are inserted based on the person’s data.
- Company without Contact Person: Variables regarding persons remain empty.
- Person: Variables regarding companies remain empty.
If there is a default contact person (appears with blue background) on a card, Address variables are replaced with that person’s data. If there is no such person, the default address of the company is the main contact address. In case of a private individual, the default address of the person is the main contact adress.
Date
It is possible to insert variables that display specific dates (e.g. Today, Tomorrow, In a month). The benchmark is the current day.
Example: The workshop is scheduled for {%Date.Tomorrow%} at 09:00 a.m.
Links
You can insert links for data modification. If the recipient clicks on the link in the message, field values of cards belonging to the recipient will be replaced automatically with values set by you.
Other
The Other folder contains the following variables:
- Email activation link
- Email ID
- Opportunity card Url
- System ID
- System name
- Unsubscribe link
- View in browser link
In the message this variable is replaced with a link that is for activating not subscribed email addresses. This variable can be used if MiniCRM is connected to your website and you are using the Double opt-in method.
For more information, see: Forms
It can also be used if a client’s email address wasn’t activated during import. In that case, the link can be inserted into a custom email sent out manually. If the recipient clicks on the link, the email address will be active.
In the message this variable is replaced with an ID that identifies the recipient’s email address.
In the message this variable is replaced with the Url of the relevant opportunity card. If the recipient inserts the Url into the address bar of the browser, the card is opened immediately (if the user is logged in).
In the message this variable is replaced with the System ID that helps the user in identifying a system when more systems are used.
In the message this variable is replaced with the System name that is displayed in the footer of the emails and on the bottom of the Unsubscribe page. It can be set centrally and can only be modified by a CRM consultant.
MiniCRM automatically inserts an unsubscribe link and a text into the end of mass emails (not displayed in Preview).
If you insert the link (not displayed in Preview) by using the Other: Unsubscribe link variable, you can write a custom text for unsubscribing.
However, in custom emails and emails sent to confirm a subscription, neither the text nor the link is displayed.
If the recipient clicks on the link, the Unsubscribe page is loaded on which the client can unsubscribe or report Spam by entering their email address.
This variable is useful if it is possible that the recipient won’t see the content of the sent email. Type e.g. “View in browser” into the message and insert the variable. If the recipient clicks on the link, the message is opened in the browser.
Inserting signature
You can insert your signature into emails by using the Sender: Email signature variable.
3 signature types exist in the system:
- Default signature
- Module’s central signature
- User’s custom signature
Users can edit their signatures on their Profiles.
To edit the central signature of modules, go to Settings > Edit Module page.
Using signatures:
Individual Sender:
- User’s default signature + Module’s default signature is set: System’s central signature is used
- User’s custom signature + Module’s default signature is set: User’s custom signature is used
- User’s default signature + Module’s custom signature is set: Module’s custom signature is used
- User’s custom signature + Module’s custom signature is set: User’s custom signature is used
Central Sender
- User’s default signature + Module’s default signature is set: System’s central signature is used
- User’s custom signature + Module’s default signature is set: System’s central signature is used
- User’s default signature + Module’s custom signature is set: Module’s custom signature is used
- User’s custom signature + Module’s custom signature is set: Module’s custom signature is used
Identify card
There are 2 possible methods of doing this:
- Click on the Link icon [5.1.] and check the Identify card option [5.2.]. After that, a code will be added to the URL of your website containing the form. That code identifies the relevant client and the card.
![]()

- Insert the URL of your website (containing the form) into the template, type the ?i= signs after it, and insert the {%Project.Hash%} variable by clicking on the Insert variable icon and selecting the Card: Project hash option.
Example: http://www.sample.com/to-prospects.php?i={%Project.Hash%}
If a client clicks on the (not shortened) URL to fill out a MiniCRM form on your website, the form identifies the client and their card without entering their email address again.
You don’t have to add contact fields to the form at all.
In case of links for data modification, you don’t have to check this option because that link already contains the ID.
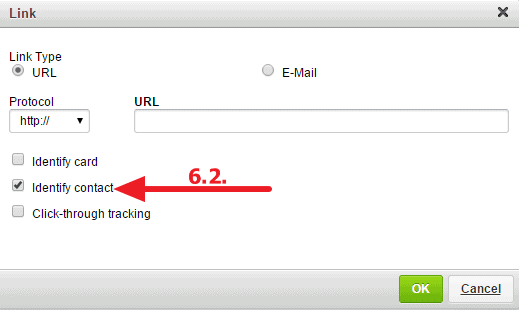
Identify contact
By selecting this option, the contact person of the card is identified by a link.
Click on the Link icon [6.1.] and check the Identify contact option [6.2.]. After that, a code will be added to the URL of your website containing the form. That code identifies the relevant contact person. A “c” parameter contains the code that is added to the link. The recipient’s contact ID (ContactHash) is added to that “c” parameter.
You don’t have to add contact fields to the form because the new card will be added to the relevant contact person, after filling out the form. If a client has a card in a module, it is possible to add a new card to that client in another module. Namely, you can create a form in a module and send the email from another one, and add a new card to the client through the form.
![]()
Click-through tracking
This function is checked by default. To turn it off, remove the check mark from the Click-through tracking field [7.1.].
You can turn on this function for every link separately. To do this, hover the mouse over a link, click on the Link icon [7.2.] and check the Click-through tracking option [7.3.].
If you go to Email Reports and click on the number next to a template’s name, you can sort by links.
![]()
![]()
Links for data modification already track click-through so don’t check the Click-through tracking option if you are using them.
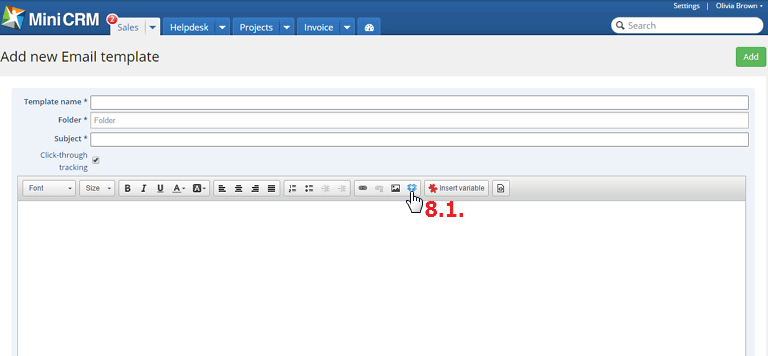
Dropbox
To insert a link to files stored on Dropbox.com, click on the Insert file from Dropbox icon [8.1.].
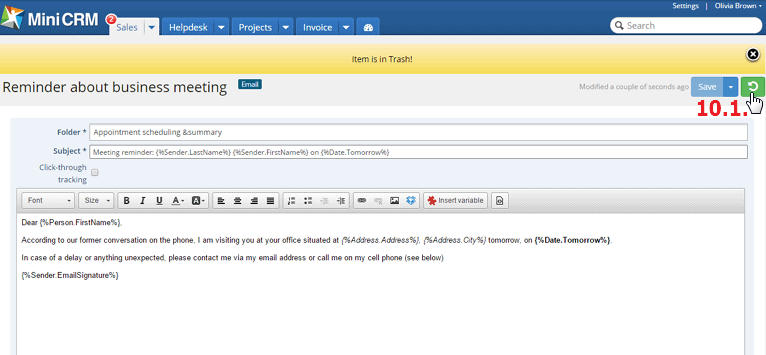
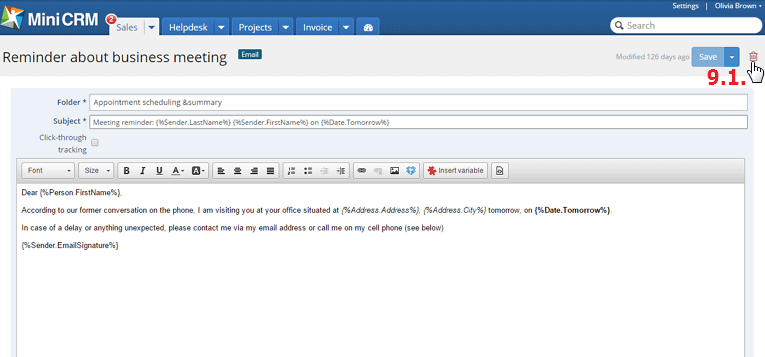
Deleting templates
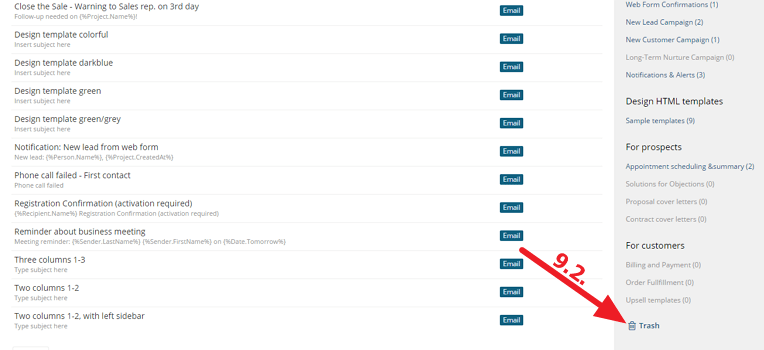
To delete a template, click on its name, then on the Move to Trash icon [9.1.] and confirm your action. The template will be moved to Trash. To load it, go to the list of templates and click on [Trash] [9.2.].
Restore templates
Click on Trash, then on the name of the template and click on the Restore icon [10.1.].